The aroma of warm spices, the vibrant orange hue, and the promise of creamy, comforting flavor – few desserts capture the essence of autumn and festive gatherings quite like pumpkin pie. It's often the star of the Thanksgiving table, carrying with it a certain gravitas that can sometimes feel intimidating for the home baker. But what if we told you that achieving the perfect pumpkin pie, one that earns gasps of admiration for both its taste and its beauty, is far more achievable than you might think?
Forget the pressure, because we're about to unveil a foolproof approach that combines the convenience of modern baking with the irresistible taste of an old-fashioned, made-from-scratch dessert. This isn't just about a recipe; it's a holistic guide to creating a pumpkin pie that not only satisfies every craving but also stands out as a culinary masterpiece. Prepare to impress your guests, one delicious, beautifully decorated slice at a time.
The Secret to a Foolproof Perfect Pumpkin Pie
Calling a recipe "perfect" is indeed a bold claim, but we stand by it when it comes to this approach to pumpkin pie. The magic lies in striking a harmonious balance between efficiency and quality. While some believe a truly perfect pumpkin pie demands a laborious, entirely from-scratch process, we argue that smart shortcuts can deliver equally stunning results without the undue stress.
The foundation of our foolproof pie begins with an excellent crust. While making your own pie dough can be a rewarding endeavor, a high-quality refrigerated pie crust offers an incredible head start that tastes surprisingly homemade. Brands like Pillsbury™ have perfected a flaky, buttery crust that provides the ideal vessel for your creamy pumpkin filling. This simple swap dramatically reduces prep time, allowing you to focus your energy on the delicious filling and artistic presentation. By embracing this convenience, you’re not compromising on flavor; you’re simply choosing a smarter path to that coveted homemade taste. Discover more about this clever balance in our related guide: Perfect Pumpkin Pie: Homemade Taste with Minimal Effort.
When the stakes are high, especially during a holiday feast, having a reliable method means you can enjoy the baking process rather than dread it. This approach ensures your pumpkin pie remains the undisputed main event, delighting everyone with its exquisite taste and texture.
Crafting Your Creamy, Dreamy Pumpkin Filling
While the crust sets the stage, the filling is undoubtedly the heart of the perfect pumpkin pie. Its success hinges on a few critical considerations, starting with your ingredients. The creamy texture and rich flavor come from carefully selected and properly combined components.
Firstly, a crucial distinction: always read your canned pumpkin label carefully. You want pure canned pumpkin, not canned pumpkin pie mix. Pumpkin pie mix comes pre-sweetened and seasoned, which will throw off the carefully balanced flavors of our recipe. Pure pumpkin allows you to control the sugar and spice levels, tailoring the pie to your preference and ensuring that authentic, deep pumpkin flavor shines through.
Secondly, pay close attention to your dairy. Many recipes call for evaporated milk, and it's essential not to confuse this with sweetened condensed milk. While both are milk products that have had water removed, they are vastly different:
- Evaporated Milk: Unsweetened, concentrated milk, offering a rich, creamy consistency without added sugar. It contributes to the pie's custardy texture.
- Sweetened Condensed Milk: Heavily sweetened and very thick, often used in candies or no-bake desserts. Using this in your pumpkin pie will result in an overly sweet pie with a different, often firmer, texture due to its high sugar content and caramelization during baking.
Once you have your core ingredients, the mixing technique is key. As with many baked goods, combining your wet and dry ingredients separately is a step often overlooked but vital for the best pumpkin pie. Whisk all your spices (cinnamon, nutmeg, ginger, cloves, and perhaps a pinch of allspice or even a whisper of black pepper for depth), sugar, and any other dry components together thoroughly in one bowl. In another, combine your pure pumpkin, evaporated milk, eggs, and vanilla extract. Then, gently incorporate the dry mixture into the wet. This method ensures that every spice and grain of sugar is evenly distributed, preventing pockets of unmixed ingredients and guaranteeing a consistently flavorful, lump-free filling that sets beautifully into a smooth, custardy delight.
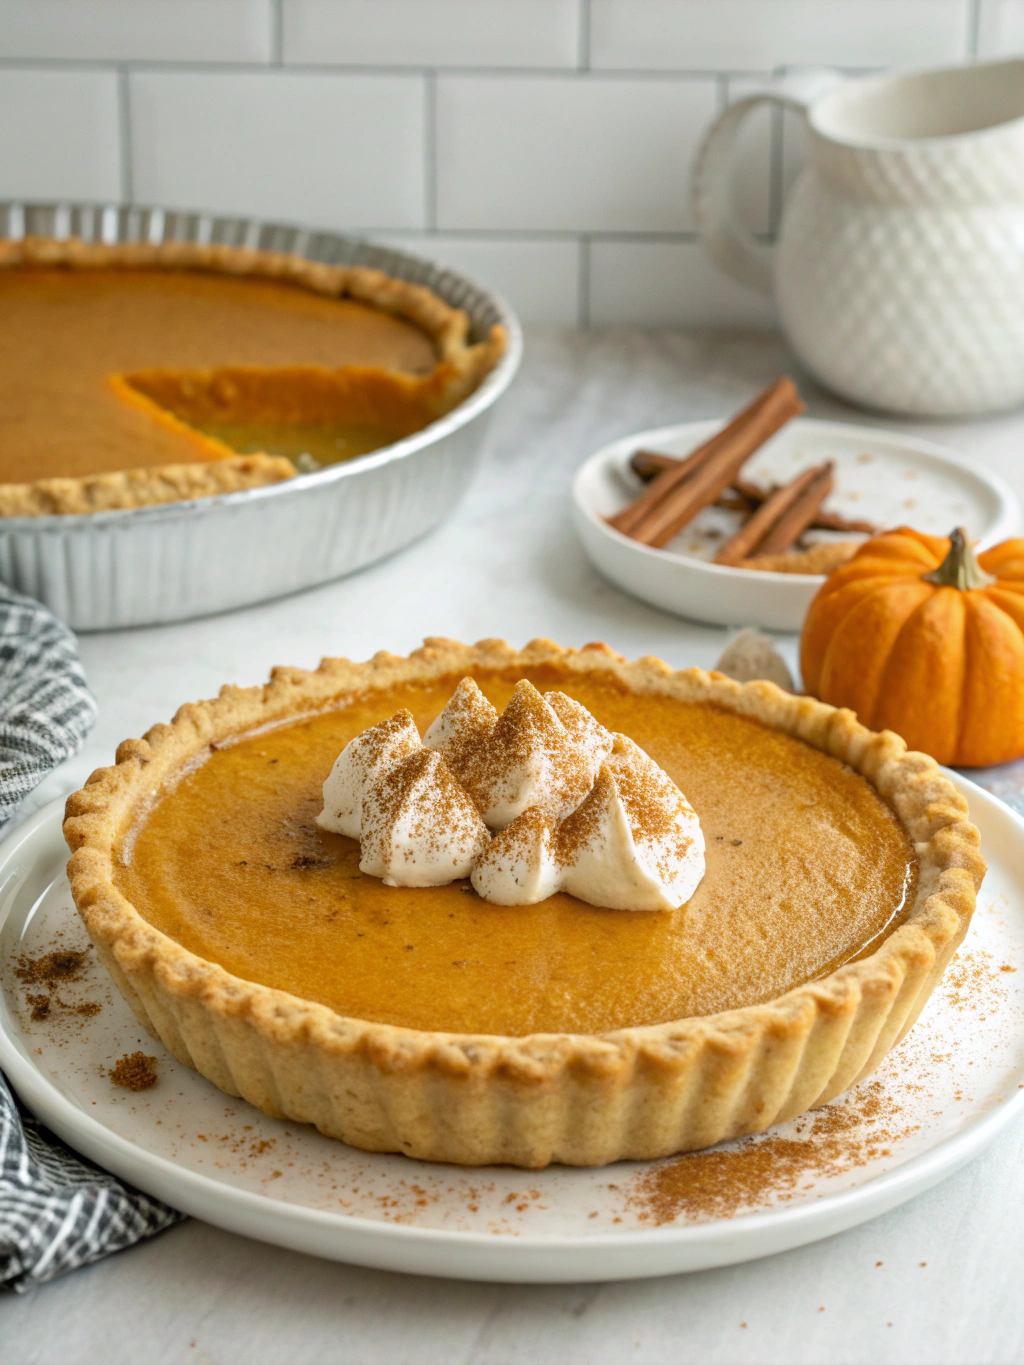
Elevate Your Presentation: Stunning Pie Crust Decor Techniques
Once you've mastered the filling, it's time to turn your attention to the visual appeal. While taste is paramount, a beautifully decorated crust transforms your pie from simply delicious to truly impressive. It's how you truly set your perfect pumpkin pie apart, signaling craftsmanship and care to your eager guests. Don't worry, these techniques are simpler than they look and offer a fantastic way to personalize your dessert.
The Classic Scalloped Edge
This technique creates a charming, undulating border that looks both elegant and rustic.
- After placing your pie crust in the pan, trim the edges, leaving about an inch of overhang.
- Fold the overhang under itself to create a sturdy, raised rim around the edge of the pie plate.
- Place your thumb and index finger about an inch apart on the outside of this raised edge.
- With your other index finger, gently push the pastry inward towards the outside, forming a scalloped curve.
- Repeat this motion around the entire circumference of the pie, ensuring even spacing for a uniform look.
The Rustic Rope or Pinched Edge
A rope edge adds texture and a beautiful, hand-crafted feel that is deceptively simple to achieve.
- Prepare your crust rim as you would for the scalloped edge (trim, then fold under).
- Place the side of your thumb at an angle on the pastry edge.
- Pinch the pastry by pressing the knuckle of your index finger down into the pastry towards your thumb. This creates a distinct indentation and a raised "rope" segment.
- Continue this pinch-and-press motion around the entire pie, overlapping slightly to create a continuous braided or twisted effect.
The Simple Forked Edge
For a quick yet attractive finish, the fork technique is your go-to. It offers a clean, textured edge that's effortlessly chic.
- Once your crust rim is prepared, take a fork and press its tines into the crust edge, facing inward towards the center of the pie.
- Apply enough pressure to create an indentation without pressing all the way through the pastry.
- Lift the fork and rotate it slightly, so it always faces the center of the pie, as you work your way around the entire edge.
- You can vary the angle or depth of the fork for different patterns, creating anything from a simple uniform texture to a more intricate design.
For best results, consider chilling your pie crust for 15-20 minutes after decorating and before adding the filling and baking. This helps the edges hold their shape beautifully in the oven. Mastering one or all of these techniques will ensure your perfect pumpkin pie not only tastes divine but also looks as though it came straight from a gourmet bakery.
Baking to Perfection: Doneness and Beyond
The final crucial step in creating a perfect pumpkin pie is knowing exactly when it’s done. Overbaking can lead to cracks and a dry, crumbly texture, while underbaking results in a watery, unset filling. Fortunately, there’s a simple, reliable test that professional chefs and home cooks alike swear by: the jiggle test.
Towards the end of the baking time, gently jiggle the pie. What you're looking for is a subtle wobble. The edges of the pie should appear set and firm, but the very center (about a 2-inch diameter) should still have a slight, delicate jiggle, much like a perfectly set Jell-O. If the entire pie is liquidy, it needs more time. If there's no jiggle at all, it might be slightly overdone, but usually still delicious! This slight jiggle indicates that the custard is cooked through but hasn't had all its moisture baked out. The residual heat will continue to cook the center as the pie cools, allowing it to set completely.
Once your pie passes the jiggle test, carefully remove it from the oven and place it on a wire rack to cool completely. This gradual cooling is essential; resist the urge to slice into it immediately. Cooling allows the filling to fully set and solidify, preventing cracks and ensuring a clean slice. For more in-depth advice on achieving the ideal bake and avoiding common pitfalls, check out our companion article: Master the Best Pumpkin Pie: Essential Baking & Doneness Tips.
And finally, the ultimate flourish: serving. A generous dollop of whipped cream is the classic accompaniment that elevates every slice. You can use store-bought, or for an extra touch of homemade luxury, easily whip your own: simply beat together 1/2 cup cold heavy whipping cream, 1 tablespoon powdered sugar (or granulated, to taste), and 1/2 teaspoon vanilla extract until soft or stiff peaks form. For best results, chill your mixing bowl and beaters beforehand – this helps the cream whip up faster and hold its shape longer. This creamy cloud perfectly complements the warm spices and rich texture of your perfectly baked pumpkin pie.
Conclusion
Creating the perfect pumpkin pie doesn't have to be a daunting task. By combining the convenience of a quality refrigerated crust with a meticulously crafted, flavorful filling, and adding a personal touch through decorative techniques, you can achieve a dessert that is both effortlessly elegant and undeniably delicious. Remember the key distinctions in ingredients, the importance of proper mixing, and the subtle art of the jiggle test for doneness. With these foolproof tips and a dash of confidence, you're not just baking a pie; you're crafting an experience that will impress your guests and become a cherished tradition. So go ahead, embrace the joy of baking, and serve up a pumpkin pie that's truly perfect in every way.
